|
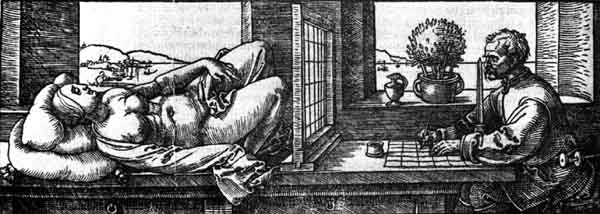
| Albrech Dürer (1471-1528) Draughsman Making a Perspective Drawing of a Woman, 1525. Etching. The Metropolitan Museum of Art, New York. |
PERSPECTIVE MACHINE, USING A FINDER, AND USING A GRID

|
| Albrech Dürer (1471-1528) Draughsman Making a Perspective Drawing of a Woman, 1525. Etching. The Metropolitan Museum of Art, New York. |
PERSPECTIVE MACHINE
String a grid in
a frame, (preferred is a grid dividing the frame into thirds or
a multiple of three, and a frame in golden proportion or the same
proportion as your paper), fix it in place between you and your
subject, as shown in Durer's etching. Use it along with a similar
grid on your paper to aid in producing an accurate layout of your
subject matter. Note that the relationship between your eye, the
frame and the subject must remain constant. Useful when dealing
with foreshortening or when accuracy of proportion is important
to the layout.
A variation of this that works somewhat
differently, in that you draw directly on the picture plane, is
to place a piece of clear Plexiglas fixed in place between you
and your subject, you can now draw your subject on the Plexiglas.
Use a suitable maker, one that will clean off, and rough in your
sketch. Now transfer the drawing to your paper using tracing and
transfer papers, or transfer and enlarge using a grid. Gauze stretched
in a frame can be used in place of Plexiglas, and if the size
is right, can make it easier to transfer the rough sketch to paper
or canvas.
USING A FINDER
When viewing a
subject, especially a landscape, it can be difficult to select
what to include and what to exclude from the composition. If you
find this to be the case you might try using a "finder"
to assist in selecting that portion of the universe to include
in your composition, and in its placement on your paper.
You can make a finder from a piece of cardboard. Cut a
rectangular opening approximately 3.5"x 5". (This is
approximately the same proportion as a sheet of watercolor paper,
if you are using some other size paper adjust the proportions
of the rectangular opening to match your paper.) Hold this frame
in front of you and closing one eye and moving the finder, study
the arrangement of shapes you see in the finder. Move the finder
around until a suitable arrangement is found. Once you have developed
the "habit of selection" you will find it is no longer
necessary to use the finder.
A photographic slide frame can be used as a finder, however,
because of its size, you will need to hold it rather close to
your eye.
John Pike's "Wonderful Perspective Machine" is
such a finder with some extra features. It is a blue plastic frame
(blue to aid in judging the values by neutralizing the color)
with gird lines marked on it and moveable thin steel strips that
can be lined up with building or other angles and are then held
in place by the magnetic frame border. This allows you to set
the strips and then judge the angle in relation to the grid on
the finder and the same grid lightly marked on your paper.
USING A GRID to Enlarge and Transfer a Drawing
Draw
a grid on a sheet of clear acetate and fasten it over the top
of your small sketch. Lightly draw a similar but larger grid on
your larger paper. Note where lines of your subject cross the
grid lines and draw those points in their respective places on
your larger paper.